


Makeup là phương tiện hoàn hảo để kích thích sự sáng tạo của một người, tìm ra các màu sắc mới để ứng dụng và những cách thức mới để thử. Kẻ mắt nghệ thuật (Artsy Eyeliner) hay còn được biết với tên gọi khác là (Graphic Eyeliner) – là một xu hướng trong cộng đồng trang điểm. Kiểu makeup mắt này liên quan đến việc sử dụng eyeliner để tạo đôi mắt ấn tượng và độc đáo. Sẽ rất thú vị khi thử nghiệm kiểu vẽ eyeliner này, đặc biệt nếu bạn thích tìm kiếm những cách trang điểm sáng tạo. Hãy thực hành nhiều lần, để có thể ứng dụng kiểu kẻ mắt lôi cuốn gây ấn tượng với bạn bè và gia đình của bạn.
Trình tự 1: Chuẩn bị cho mắt
Bước 1: Bắt đầu với một khuôn mặt sạch
Trước khi makeup, hãy đảm bảo khuôn mặt của luôn sạch sẽ và không dính bất kỳ lớp trang điểm nào mà bạn có thể đã makeup trước đó. Để đảm bảo rằng bạn đang bắt đầu với một gương mặt mộc. Một khuôn mặt sạch sẽ, tươi tắn sẽ giúp lớp makeup được ứng dụng tốt.

Bước 2: Bôi kem lót mắt
Kem lót mắt là cơ sở cho các phần makeup mắt còn lại của bạn. Nó giúp phấn mắt và eyeliner bám chặt vào mí mắt mà không bị nhòe hay phai đi. Đồng thời cũng giữ lớp makeup mắt của bạn lâu trôi hơn nhiều so với việc bạn không sử dụng kem lót mắt. Kem lót trang điểm có thể được mua tại các cửa hàng thuốc và cửa hàng mỹ phẩm.
Kem lót mắt có thể có nhiều mức giá khác nhau nhưng bạn hoàn toàn có thể tìm thấy những sản phẩm chất lượng với giá cả phải chăng, chẳng hạn như loại kem lót mắt của NYX Cosmetics. Kem lót có thể được thoa bằng các ngón tay và chỉ sử dụng một lượng nhỏ đủ để lớp makeup có thể được giữ chặt. Chấm một lượng nhỏ bằng hạt đậu lên đầu ngón tay, xoa với ngón tay kia và thoa lên cả hai mí mắt.

Bước 3: Đánh kem che khuyết điểm
Kem che khuyết điểm sẽ che đi bất kỳ đường gân, sự đổi màu hoặc không đều màu của mí mắt và sẽ tạo một lớp nền đẹp, trung tính để dễ thao tác. Chấm một lượng bằng hạt đậu lên đầu ngón tay và tán lên mí mắt. Lặp lại ở phía bên kia. Hãy nhớ tán kĩ cho đến khi nó được bám đều vào mí mắt.

Bước 4: Chọn loại kẻ mắt phù hợp
Loại bút kẻ mắt tốt nhất để tạo kiểu mắt đồ họa là loại kẻ mắt nước. Bạn cũng có thể sử dụng một chiếc cọ kẻ mắt đầu xéo và một ít phấn phủ màu tối để đánh dấu đường eyeliner bạn muốn kẻ, và cuối cùng, sử dụng kẻ mắt nước để kẻ eyeliner lên đường đã đánh dấu.
Loại kẻ mắt nước tốt nhất để sử dụng là bút lông hoặc bút dạ có đầu mảnh. Những loại này sẽ cung cấp cho bạn ứng dụng tạo đường eyeliner chính xác nhất. Kat Von D’s Tattoo Liner in Trooper là một loại bút kẻ mắt nước phổ biến để sử dụng kẻ eyeliner cực kỳ chính xác mà vẫn dễ dàng sử dụng.

Trình tự 2: Áp dụng kẻ mắt cánh trên và dưới
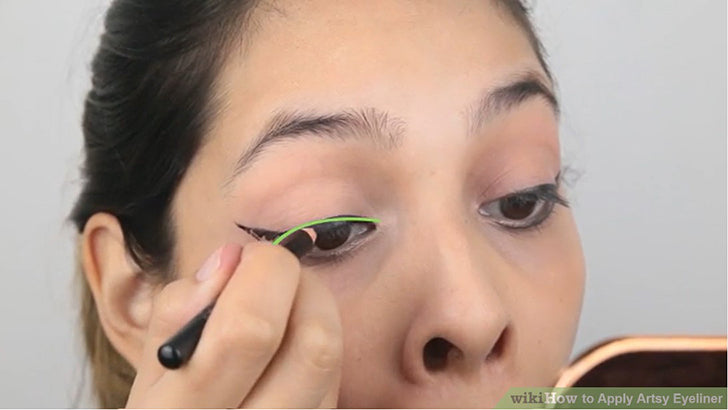
Bước 1: Vẽ viền cánh mi trên
Bắt đầu từ góc ngoài của mắt, từ từ và cẩn thận kẻ một đường nhỏ để tạo viền cánh mắt. Tốt nhất đường kẻ viền cánh phải là phần mở rộng cùng hướng với đường viền mi dưới của bạn. Nói cách khác, hãy tạo một đường viền cánh trông như thể nó đang kéo dài thẳng ra từ góc ngoài của mắt, thay vì gấp khúc chếch lên hay chếch xuống quá nhiều.
Bạn có thể sử dụng một miếng băng dính theo hướng dẫn để đảm bảo đường kẻ được thẳng. Điều này sẽ giúp bạn tạo viền cánh mắt chính xác hơn. Dùng cọ che khuyết điểm để sửa những lỗi sai. Chấm cọ vào kem che khuyết điểm và dùng nó để nhẹ nhàng che đi những lỗi kẻ sai. Nếu bạn lỡ vẽ đường kẻ hơi cong, kem che khuyết điểm sẽ giúp bạn che đi nó.

Bước 2: Vẽ mí trên
Bây giờ bạn đã tạo được đường viền cánh, hãy nối nó với viền mí trên, dọc theo hàng mi, để tạo kiểu kẻ mắt theo phong cách mắt mèo. Hãy cẩn thận và chậm rãi hoàn thành việc kẻ mí trên của bạn, chú ý không chớp mắt và làm lem đường eyeliner. Sẽ hữu ích hơn khi nhìn xuống gương trang điểm có đèn chiếu sáng khi kẻ có thể mua ở cửa hàng tạp hóa hoặc cửa hàng làm đẹp.

Bước 3: Vẽ đường viền cánh mắt dưới
Theo cách tương tự như bạn đã làm với mí trên, vẽ một đường eyeliner cho mí dưới song song nhưng không trùng vào đường viền cánh trên. Đường viền cánh dưới sẽ hướng ra ngoài từ góc ngoài của mắt. Điều này giúp bạn định hình vị trí cần đường đi của eyeliner và hướng nó ra ở góc nào.

Bước 4: Vẽ mí mắt dưới
Đường eyeliner cho mí dưới nên được vẽ nhẹ nhàng theo đường cong của mi dưới. Điều này không áp dụng để kẻ eyeliner cho đường viền trong mi dưới (đường waterliner); thay vào đó, đường eyeliner nên được kẻ ngay bên dưới hàng mi dưới. Cẩn thận kẻ eyeliner cho mí đưới, đảm bảo rằng đường kẻ mỏng hơn mí trên. Sau đó, nối với đường viền cánh dưới, để tạo một đường liền mạch mượt mà không bị ngắt quãng từ khóe mắt này sang khóe mắt kia. Cuối cùng, lặp lại ở phía bên mắt còn lại.

Trình tự 3: Sử dụng phần trống để tạo hình giác
Bước 1: Kẻ đường viền mi trên
Sử dụng eyeliner để kẻ viền mi trên. Đường eyeliner phải kẻ đủ dày để bạn có thể xóa một phần nhỏ của đường eyeliner và sử dụng khoảng trống để tạo hình tam giác. Bạn có thể kẻ hoặc không kẻ thêm đường cánh mắt; tuy nhiên, nếu kẻ cánh mắt sẽ tăng thêm phần kịch tính cho đôi mắt của bạn.
Nếu bạn muốn tạo cánh mắt, hãy vẽ một đường thẳng chếch lên bắt đầu từ góc ngoài của mắt để định hướng vị trí bạn muốn kẻ eyeliner ra ngoài. Sau đó nối trở lại với viền mi trên. Dùng eyeliner để tô lên các phần trống còn lại trên viền mi trên để hoàn thành. Khi hoàn thành, bạn sẽ tạo được một đường eyeliner liền mạch từ khóe mắt này sang khóe mắt kia và có một cánh ở cuối mắt.
Bước 2: Xóa một phần nhỏ trên đường kẻ eyeliner
Giữ tăm bông và bọc khăn tẩy trang xung quanh đầu tăm bông. Mục đích của việc này là để loại bỏ chính xác một phần nhỏ trên đường eyeliner đã vẽ. Tăm bông sẽ cho phép bạn loại bỏ chính xác hơn so với việc bạn chỉ dùng đầu ngón tay để lau. Giữ bông tẩy trang trên đầu tăm bông, bắt đầu lau một phần nhỏ đường eyeliner, không to hơn đầu tẩy của bút chì, ở giữa mí mắt.

Bước 3: Vẽ một hình tam giác
Sau khi xóa một đoạn chính giữa đường eyeliner, bạn sẽ có 2 đường kẻ eyeliner: một bên trái và một bên phải. Bắt đầu từ đầu gióc trên ở mỗi bên, vẽ một đường thẳng đi xuống theo góc 45 độ về phía mi, và gặp nhau ở điểm giữa khoảng trống. Điều này sẽ tạo ra một hình dạng tam giác. Vì phương pháp này sử dụng khoảng trống (tức là da mí mắt của bạn) để tạo ra hình tam giác, cho nên bạn không cần phải tô eyeliner vào.

Trình tự 4: Thêm đường kẻ màu thứ hai
Bước 1: Kẻ viền mi trên của bạn bằng kẻ mắt nước màu đen
Sử dụng những chuyển động nhỏ và chính xác, kẻ viền mi trên bằng kẻ mắt nước màu đen. Kẻ đường eyeliner từ khóe mắt này sang khóe mắt kia. Bạn có thể tạo thêm cánh mắt hoặc không, tùy thuộc vào sở thích của bạn.

Bước 2: Kẻ thêm đường kẻ mắt màu thứ hai
Để thêm một chút kịch tính và nghệ thuật cho đường eyeliner của bạn, hãy thêm một đường kẻ mắt màu thứ hai, sẽ được vẽ ở phía trên đường eyeliner màu đen. Điều này sẽ mang lại cho đôi mắt của bạn một màu sắc nổi bật và sẽ thêm nét tinh tế cho lớp trang điểm của bạn. Bút hoặc cọ kẻ mắt mảnh hơn sẽ giúp tạo nét chính xác hơn.

Bước 3: Vẽ đường eyeliner thứ hai ngay trên dòng đầu tiên
Bắt đầu từ góc trong của mắt, kẻ đường eyeliner màu ngay trên đường đen. Sử dụng các nét nhỏ, vẽ đường thẳng cho đến khi bạn đi đến cuối đường eyeliner đầu tiên. Vẽ đường này có thể đòi hỏi rất nhiều độ chính xác, nếu không đồng đều sẽ dễ che mất đường eyeliner màu đen. Tuy nhiên, cũng có thể dễ dàng hơn một chút vì bạn chỉ cần vẽ theo đường eyeliner màu đen là được.

Bước 4: Chuốt mascara
Khi bạn hoàn thành kiểu kẻ mắt đồ họa của mình, hãy chuốt một hoặc hai lớp mascara lên lông mi của bạn. Giữ cọ chuốt ở gốc mi và lắc nhẹ. Sau đó chuốt hướng lên trên và hướng ra ngoài dọc theo hàng mi. Đối với lớp chuốt thứ hai, bắt đầu từ gốc mi và di chuyển cọ chuốt lên và hướng ra ngoài một lần nữa.

Tác giả: Daniel Vann. Biên dịch: Huyền Trân.
Nguồn: Wikihow. Bản quyền thuộc về: Kallos Vietnam.
Đôi nét về tác giả Daniel Vann
Bài viết này được đồng tác giả bởi Daniel Vann. Daniel Vann là Giám đốc Sáng tạo của Daredevil Cosmetics, một studio trang điểm ở Seattle Area. Anh đã làm việc trong ngành mỹ phẩm hơn 15 năm và hiện là chuyên gia thẩm mỹ và giáo viên trang điểm đã được cấp phép.


4 comments
Jill Stuart chỉ tô điểm cho viền mắt dưới, Lanvin với liner đuôi mắt đầy sáng tạo, Missoni phủ viền mắt màu pastel, Moschino với đường viền đen bóng, hay liner đen nhánh sắc sảo trên sàn diễn Dolce & Gabbana.
Không dùng chung đồ trang điểm với người khác. Điều này có thể lây lan vi trùng và bệnh tật. Chỉ sử dụng đồ trang điểm của riêng bạn.
Đừng ngại thử những màu sắc cá tính, khác thường. Trang điểm nên vui vẻ và sáng tạo!